September 24, 2017
Writing technical presentations that include code samples and diagrams can be really tedious. In mainstream presentation software, such as Keynote and PowerPoint, your workflow is likely to manually copy-and-paste source code from your editor into your slides. If you’re not using the drawing capabilities of your presentation software, you have to perform similar steps to include diagrams.
In my process of writing a technical presentation, code samples and diagrams are not written first, and included in the slides at the last minute – I work iteratively on slide content, source code, and diagrams, all at the same time. Having to repeat the time-consuming and error-prone process of updating code samples in slides, each time my original source code changes, breaks my creative flow completely. I also want to have my source code compiled and executable, so that I can be confident it is correct.
The main features I’m looking for in a technical presentation setup includes:
I’m less interested in:
This article demonstrates a setup that fulfills these goals, using Pandoc Markdown, Beamer, Graphviz and Make. I have also created a template based on my setup, that you can use if you like this approach.
One of my favorite tools in technical writing is Pandoc. I use it for documentation, talks, Markdown preview, this website, and for converting existing documents to more desirable formats1.
A very nice feature of Pandoc is slideshow output formats. You can write your slides in Markdown using regular headings, with the slide content below:
---
title:    My Awesome Topic
subtitle: Ramblings on the Subject
author:   Alice
date:     September 2017
---

# Introduction

- Something
- Another thing
- The last one

# I Can LaTeX

\centerline{\Large{\textit{I can embed LaTeX as well.}}}

# A Program

``` javascript
function coolTools() {
    return ["pandoc", "beamer"];
}
```
Build the LaTeX source code using Pandoc and the beamer
target, and then generate the PDF using pdflatex:
pandoc -t beamer -o slides.tex slides.md
pdflatex slides.tex
Voilà! You have a PDF, such as this one.
You might want to customize some of the Beamer styling, which is done
by including a .tex file using the -H command
line parameter of Pandoc. The full template described below uses this
technique to change the styling.
As stated in the introduction of this article, I want my source code samples to compile, and possibly be executable. If I have to write code directly in the slides, I will most likely make mistakes, and there will be no compiler or toolchain to tell me about it.
There are a number of ways to include code from external files with
Pandoc, but I will shamelessly refer to my own filter called pandoc-include-code,
which I use extensively. To include a source code file, write an empty
fenced code block and use the include attribute to specify
the path to the external file:
``` {.javascript include=my-program.js}
```
Now, suppose you have a Haskell program in a file
Sample.hs.
module Sample where

data Animal = Dog | Cat

isAfraidOf :: Animal -> Animal -> Bool
isAfraidOf Cat Dog = True
isAfraidOf _ _     = False

result :: Bool
result = Dog `isAfraidOf` Cat
The issue is you want to include just the Animal data
type and the isAfraidOf definition, not the top module
declaration and the result definition. By wrapping the
content in two special comments, start snippet <name>
and end snippet <name>, you create a named
snippet:
module Sample2 where

-- start snippet animals
data Animal = Dog | Cat

isAfraidOf :: Animal -> Animal -> Bool
isAfraidOf Cat Dog = True
isAfraidOf _ _     = False
-- end snippet animals

result :: Bool
result = Dog `isAfraidOf` Cat
In the Markdown source, refer to the snippet’s name when including:
``` {.haskell include=Sample2.hs snippet=animals}
```
The included code will be only that in your snippet:
data Animal = Dog | Cat

isAfraidOf :: Animal -> Animal -> Bool
isAfraidOf Cat Dog = True
isAfraidOf _ _     = False
You can still compile the code, load it in the REPL, and write tests for it, while including interesting parts into your slides. You are not depending on specific line number ranges, which of course becomes a nightmare once you edit your source code.
The last feature of pandoc-include-code
I want to demonstrate is the dedent attribute. Let’s say we
have a Javascript file with a class method that you’re interested
in:
class Foo {
  // start snippet bar
  bar() {
    return "bar";
  }
  // end snippet bar
}
When including snippets of indented source code, you might want to
“dedent”, i.e. remove extra leading whitespace. This is easily
accomplished with the dedent attribute, specifying how many
whitespace characters you want removed:
``` {.javascript include=sample1.js snippet=bar dedent=2}
```
The included code will be “dedented” to the first column:
bar() {
  return "bar";
}Often I want a couple of diagrams in a presentation, to illustrate some design or flow in a program. I enjoy generating diagrams from plain text sources, instead of drawing by hand or using special drawing software with binary formats. Both Graphviz and PlantUML are powerful tools that are relatively easy to integrate with the presentation build in a Makefile.
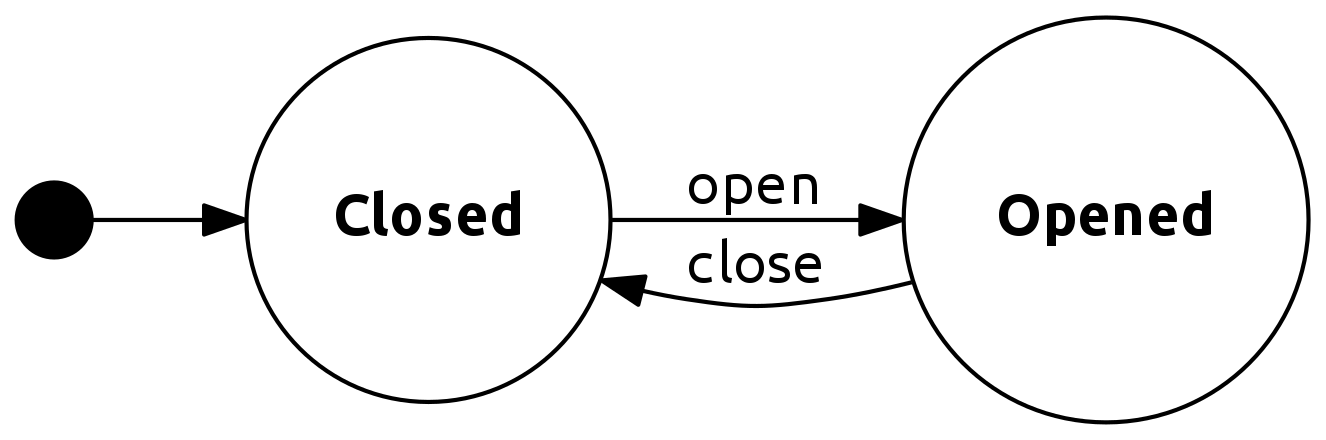
Let’s say I want to generate a state diagram. The following Graphviz source code generates a simple yet beautiful diagram:
digraph door_states {
  graph [ dpi = 300 ];
  splines=true;
  esep=5;
  rankdir=LR;

  size="8,5";

  edge [ fontname = "Ubuntu" ];
  node [ fontname = "Ubuntu Bold" ];

  node [shape = point, width = .25, height = .25 ];
  Start;

  node [shape = circle];
  Opened;
  Closed;

  Start -> Closed
  Closed -> Opened  [ label = "open" ];
  Opened -> Closed  [ label = "close" ];
}
Generate a PNG file using the dot command:
dot -Tpng -o door.png door.dotThe generated PNG image looks like this:
To automate this process with Make, you can find all
.dot files, transform those paths into a list of target
paths, and have Make run the dot command to generate all
targets.
DIAGRAM_SRCS=$(shell find src -name '*.dot')
DIAGRAMS=$(DIAGRAM_SRCS:src/%.dot=target/%.png)

.PHONY: all
all: $(DIAGRAMS)

target/%.png: src/%.dot
    mkdir -p $(shell dirname $@)
    dot -Tpng $< -o $@
A similar setup can be used with PlantUML, although you might want the JAR file to download automatically:
PLANTUML=deps/plantuml.jar

UML_SRCS=$(shell find src -name '*.uml.txt)
UMLS=$(UML_SRCS:src/%.uml.txt=target/%.png)

.PHONY: all
all: $(UMLS)

target/%.png: src/%.uml.txt $(PLANTUML)
    mkdir -p $(shell dirname $@)
    cat $< | java -jar $(PLANTUML) -tpng -pipe > $@

$(PLANTUML):
    mkdir -p $(shell dirname $@)
    wget http://sourceforge.net/projects/plantuml/files/plantuml.jar/download -O $@
I have used PlantUML in this blog, just as described above, to generate diagrams for posts. See the post Hyper: Elegant Weapons for a More Civilized Page for an example.
Based on the techniques described in this post, I have created a template that you can use for your own presentations. It is published at GitHub. I hope this will be useful to someone, and that it can be a good complement to this article.
What I really like about the tools and techniques demonstrated in this article is that they are not limited to writing presentations. I use the same tools for writing documentation, and for writing this blog. Pandoc is an amazing piece of software, and I have just scratched the surface of what it can do. For instance, if you do not want PDF output for your talk, there’s a number of Javascript-based formats for slideshows available.
Now go on and write some cool tech talks!
I once needed to convert a technical manual from ODF to reStructuredText. A single Pandoc command later, and I had the sources for a proper Sphinx build.↩︎